Back to Asset Essentials Main Menu
Bigfoot to Asset Essentials Enterprise migration
Bigfoot is now Asset Essentials Enterprise by Dude Solutions. Here you will find information that will help you have a successful transition to the new platform, as well as learn about new enhancements.
Watch the video to learn more:
Click here for video walk-throughs that will help you get up and running quickly with your Asset Essentials account.
**Important: Read before your transition to Asset Essentials**
Request form update
In Asset Essentials, the Request Form for your end users has a more streamlined look and feel. You may want to communicate this change ahead of time to your end users to let them know that their request form is going to look different after the transformation.
To help facilitate this communication here is a PDF guide you can send to your end users that illustrates the change your users will see. You can also send your Requesters to our online help guide that includes step by step instructions and video tutorials.
If you have any questions throughout this process, please do not hesitate to contact our Legendary Support Team for assistance.
Actions to take for a successful transition
For a successful transition to Asset Essentials Enterprise, we recommend taking a few quick steps:
Your new Asset Essentials Enterprise account has a unique URL that is different than your Bigfoot URL. The format of your new link should follow this example: https://assetessentials.dudesolutions.com/<clientID>. If you are not sure what your login link is, contact our Legendary Support Team. You will need to update your old Bigfoot desktop shortcuts or browser bookmarks to your new Asset Essentials URL. Below are instructions for editing your bookmark in a few of the most common browsers.
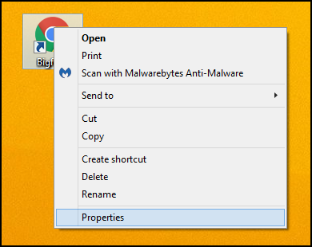
- Right click on your Bigfoot Shortcut icon.
- Click Properties.
- Paste your new Asset Essentials link into the URL section.
- Click OK.
- Test the shortcut to verify it is working.
|

|
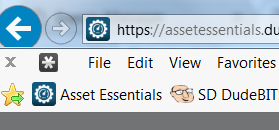
- Open Internet Explorer.
- Right click on your existing Bigfoot bookmark.
- Click on Properties.
- Edit the URL to contain your new Asset Essentials link exactly as it has been given to you.
- Click OK.
- If needed, rename your bookmark.
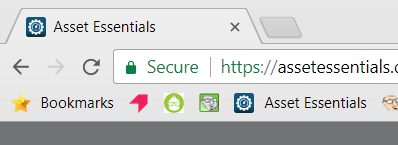
- Open Google Chrome.
- Right click on your existing Bigfoot bookmark.
- Click Edit.
- Edit the URL to contain your new Asset Essentials link exactly as it has been given to you.
- Rename the bookmark if necessary.
- Click Save.
- Open Firefox.
- Right click on your existing Bigfoot bookmark.
- Click on Properties.
- Type your new Asset Essentials URL into the Location field.
- Rename the bookmark if necessary.
- Click Save.

To stay mobile, make sure that you download the new Asset Essentials mobile app on each device currently running the Bigfoot mobile app. The Asset Essentials app replaces the Bigfoot app so that you are still able to streamline your work flow on the go. The app can be downloaded to your smartphone or tablet through either the Apple App Store or Google Play Store.
-
Access the app store on your smartphone or tablet.
-
Search for Asset Essentials.
-
Install the app on your device.

|

|
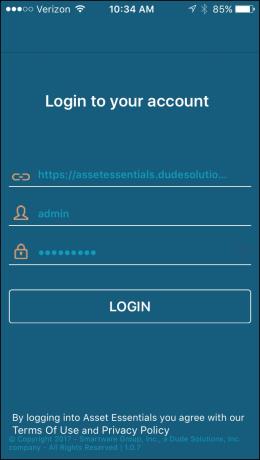
Logging into the Asset Essentials mobile app
- Tap the Asset Essentials app icon on your smartphone or tablet.
![]()
-
Enter your Login Link. The majority of the link will already be populated for you, replace the <client id> portion with your client ID. *Note: Your client ID can be found in the web address you use to login to Asset Essentials.
-
Enter your Username.
-
Enter your Password.
-
Tap Login.
If you have been using the Request Templates feature in Bigfoot, you will need to recreate your templates in Asset Essentials. We've made this process easier than ever, allowing for more customization and control over your request form.
If you are currently using Request Templates in your Bigfoot account, we recommend that you note your current request template settings. An easy way to do this would be to take a screen shot by hitting the Print Screen key on your keyboard. You can then paste the image into a word document and save it. This will allow you to reference your Bigfoot request template settings when you create your new templates in Asset Essentials after migration.
To set up Request Templates in Asset Essentials, follow the steps below:
- Click on the Admin tab, then click Configurations.
- Select Request Templates in the Templates section.
- Here you will see the default Global Template that is included with your account.
- Click on Global Template to edit the template used at all sites, or click the New button to create a custom request template.
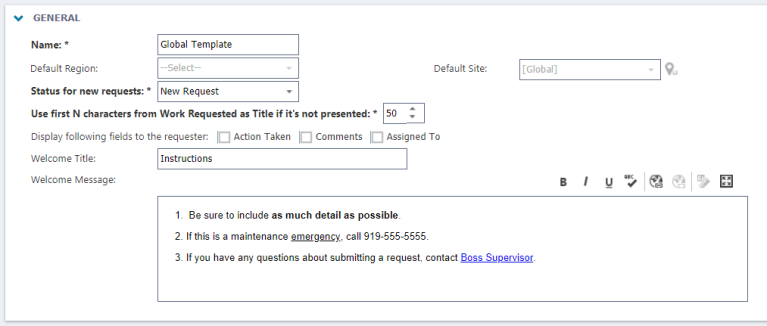
General
- Enter the Name of the template.
- If applicable, select the Default Region and Default Site.
- Choose the Status for new requests from the drop down.
- Use first N characters from Work Requested as Title if it's not presented: This setting allows you to control the number of characters of text entered in the Work Requested field that will appear as the Title of the work order if the user does not enter or is not given the option of entering a Title.
- Check the box next any additional fields you would like displayed for the requester.
- Enter a Welcome Title and Welcome Text in the fields provided to display a welcome message or special instructions at the top of the form.
Region/Site
This section will only appear if you are editing the Global Template. If you selected a Default Region or Default Site in the general section, you will not see these options when setting up your request template.
- Enter a Section Title.
- If needed, type a Section Subtext. These could be instructions for users to follow.
Sections
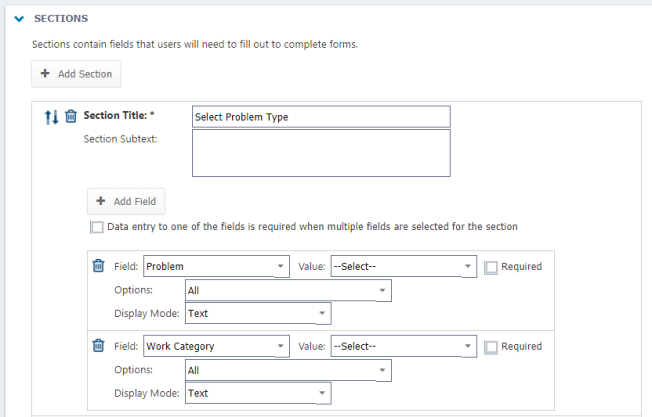
Sections allow you to customize which fields appear on the request form, as well as specify default values for those fields if needed.
- Click the Add Section button.
- Enter a Section Title.
- Type any Section Subtext if needed. These could be instructions for users to follow.
- Click the Add Field button.
- To make at least one field required in the section, check the Data entry to one of the fields is required when multiple fields are selected for the section box.
- Select one of the following fields from the drop down. Various additional options will appear depending on which field you select.
Location
- Select a Value from the drop down if you would like a default Location to be preselected for the user.
- Check the Required box to make this field required for submission.
Asset
- Select a Value from the drop down if you would like a default Asset to be preselected for the user.
- Check the Required box to make this field required for submission.
Priority
- Select a Value from the drop down if you would like a default Priority to be preselected for the user.
- Check the Required box to make this field required for submission.
Work type
- Select a Value from the drop down if you would like a default Work Type to be preselected for the user.
- Check the Required box to make this field required for submission.
Work category
- Select a Value from the drop down if you would like a default Work Category to be preselected for the user.
- Check the Required box to make this field required for submission.
- In the Options drop down, uncheck the box next to any Work Categories you would like to hide from requesters.
- Choose your preferred Display Mode.
- If you select either Icons or Icon + Text, select the Icons per row and the Rows to display initially.
Problem
- Select a Value from the drop down if you would like a default Problem to be preselected for the user.
- Check the Required box to make this field required for submission.
- In the Options drop down, uncheck the box next to any Problems you would like to hide from requesters.
- Choose your preferred Display Mode.
- If you select either Icons or Icon + Text, select the Icons per row and the Rows to display initially.
Cause
- Select a Value from the drop down if you would like a default Cause to be preselected for the user.
- Check the Required box to make this field required for submission.
Project
- Select a Value from the drop down if you would like a default Project to be preselected for the user.
- Check the Required box to make this field required for submission.
Work requested
- Type a Value in the text box if you would like a default description to be displayed to the user.
- Check the Required box to make this field required for submission.
Documents/Images
- Select the Path you would like the uploaded documents or images to be stored in your Documents Library.
While the Global Admin user role in Bigfoot was assigned a default Site, the Global Admin role in Asset Essentials is not associated to a Site. This will impact your view across multiple aspects of the program, including summary pages and your dashboard, which will now default to include data from across all sites within your organization.
If it is important for you to maintain the same Site-based views that you are accustomed to, then you can choose to assign yourself a default site.
How to assign a site to a global admin
- Click on the Admin tab, then click on Users.
- Right-click on the name of the Global Admin to whom you are assigning a site, then select Edit from the menu.
- Select the appropriate Site from the drop down menu.
- Click Save at the top of the screen.

New enhancements
Here is an overview of the enhancements you'll see as you transition to the new platform.
View and add labor on the Work Order form
You can now easily enter Labor right from the Work Order Form. In the new Labor Entries section, you can view existing labor entries as well as add new ones.

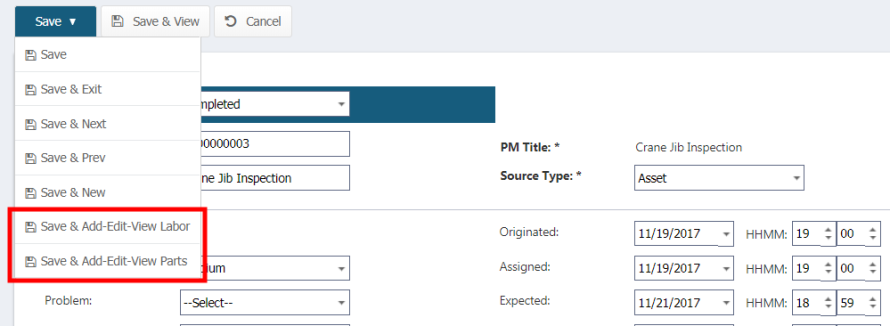
Add-edit-view labor and parts from the save menu
The Labor and Part entry options on a work order used to be found under the More button, but the More button has been removed from the work order form. Now, you will find the Labor and Part options under the Save button on the work order form.
Asset Essentials has a fresh look and feel, designed to streamline and enhance your work flow. Here are a few menu changes you will notice:
- We've added a new Calendar menu tab where you can easily access the Daily, Weekly, Monthly, and Planner views.

- You can now access your PM/PdM schedules under the Work Orders menu tab.

- All of the Configuration settings that you are used to seeing under each menu tab are now conveniently located under the Admin tab.

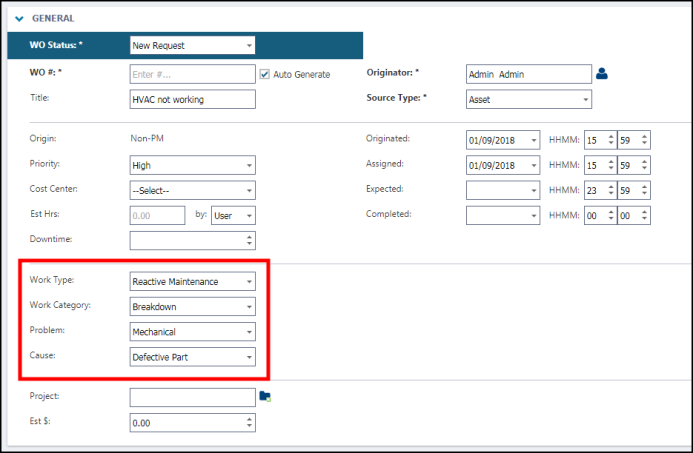
- The Work Order Form is now more streamlined and organized to make data entry even easier.
- In addition, we have added new fields to the work order form to align with industry standards, making it easier to categorize, organize, and report on your work orders.
- The new Work Type field can be used to indicate why the work is being done, such as Reactive Maintenance or Storm Damage.
- The old WO Type field has been renamed to Work Category and is used as a sub-type of the work order.
- Improved security for the connection and browser.
- New account protection measures will lock your account if unauthorized users try to gain access after several failed attempts.
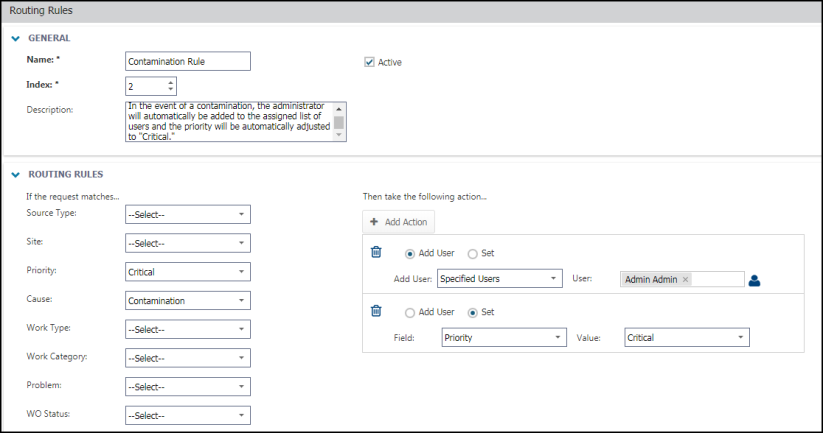
Routing in Asset Essentials allows you to automate your work flow process for requests. It tells the system when and where to send work orders, and allows for certain automated actions based on work order details. Work orders can be automatically routed based on the work order Source Type, Site, Priority, Cause, Work Type, Work Category, Problem, WO Status, Origination time, or any combination of these. Click here for more information about setting up routing in your account.
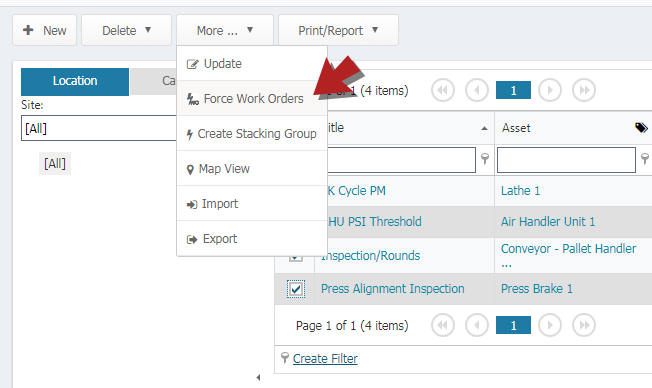
PM work orders can be force-generated in batches from the PM summary page. This feature can be used by checking the box next to any PMs you would like to force-generate, and selecting Force Work Orders from the More menu.
- The main menu structure can now be customized based on the user's role. Only the selected menu items will be visible to the users. This customization can be done on a role-by-role basis.

- Now, when editing a role, all users set for that role are automatically updated. You no longer need to apply changed permissions to each individual user in that role.
- Click here to learn more about managing user roles.
The Request Templates feature now allows you to create sections on the work request form, specifying how fields are organized and which fields are required. To learn more about how to create request templates, click here.
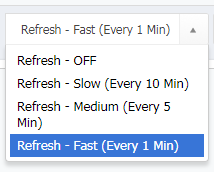
Make sure you are viewing the most up-to-date data now that the Work Order Summary Page can auto-refresh according to the setting you choose. This setting is found directly on the work order summary page.
You can now choose to receive an notification on your Asset Essentials screen for any work order matching your specifications. Once you have set up this feature, an alert icon will show next to your name. When the alert shows a red exclamation mark ( ), it means the alert system has been triggered by a work order. Click on the icon to go to the work order summary page, which will be filtered to show only the work orders that match your notification choices. Click here to learn more about enabling work order notifications.

Work Category, Problem, and Cause can now be associated to each other in a hierarchy to improve data accuracy. You will now see a new section titled Applicable To on the Problem and Cause configuration pages. These data fields on the work order form will update to only reflect applicable Causes and Problems, once a Work Category is selected.

Determine which information displays for assets, users, sites, and locations within various aspects of the program. For example, you can now choose to add a column for Asset Condition for the asset record on a work order. This feature can be accessed by clicking on Grid Settings on the Configuration page.

Users can make changes to a work order quickly, without leaving the summary page. A quick-edit window gives easy access to the most commonly edited fields. This feature can be found by right clicking on the work order record and selecting Quick Edit.

Not only will you see overall performance improvements on the mobile app, you can now do more with photo attachments! Use the annotation feature to draw attention to something specific in a photo you upload with the app. This can be done by clicking the Edit button after you either take a photo or upload a photo from your device. Click here to learn more about the new Asset Essentials mobile app.

We're here to help
In addition to the new features and functionality in Asset Essentials, you also now have access to our Legendary Client Service Center!
- View our continually updated Help Site with how-to articles and best practices to help you get the most value out of your subscription.
- Call 1-877-655-DUDE (3833) to talk to a live person 8AM EST to 6PM EST Monday through Friday. We promise to answer within three rings!
- Email support@dudesolutions.com and receive a response from our Legendary Support Team within one hour during business hours.
- Use our Live Chat feature located under the Asset Essentials help link to chat with a real person, 8AM EST to 6PM EST Monday through Friday.
- View recorded online Trainings for the lifetime of your product subscription.
